Tuesday, January 31, 2012

Tutorial: How to make a sock monkey out of 2 pairs of anklet socks

I found some socks that I thought would make cute sock monkeys.  Unfortunately, they were very short and didn't have any part that would come up the leg (if you were wearing them) so there wasn't anything to use for the legs.  I decided to buy 2 matching pairs of the socks and see if I could get it to work!

Here is how I did it:
Take 2 pairs of anklet socks

Cut off the top just under the heel on 1 sock

Cut off just the ribbing on 1 sock

On the sock that you cut off under the heel, cut from the toe to the opening
NOTE:  I would suggest starting at the toe and cutting to within 1" of the top where you cut off the heel (leaving an uncut band at the top)

Pin the 2 socks' cut edges together lining up the top and bottom of the socks

Sew ¼" from edge all the way around

This is what you end up with

Turn it inside out with the heel on top

Sew.  Clicking the picture will enlarge it making it easier to see the marks.
I ended up with more left over pieces having to use 2 pairs.

Turn right side out

This is why I would leave the 1" band uncut at the top

Stuff

I also had to sew this extra area shut, too

Sew him together

Here is the seam along the belly where the 2 socks were attached together

Monday, January 30, 2012

Tutorial: How to make a sock monkey out of one knee high sock

I found a pair of knee high socks that I wanted to use for a sock monkey.  I figured that there had to be a way to get a sock monkey out of only 1 sock since to use both socks on 1 monkey would mean LOTS of left over scraps. 

Here is how I did it:

Take 1 sock ☺

Turn it inside out so the heel is on top

Sew the pieces. 
If you click on the picture it should be easier to see the marks

Cut the pieces apart

This is all that I had as extras!

Turn right side out


Stuff

Sew him together - Ta da!

Saturday, January 28, 2012

More Sculpting

I don't really know why I decided to try sculpting other than it looked like something I maybe could do and so I wanted to try. I didn't really need something else to do!

Well, today (or rather yesterday since it's currently 1:50 am - can't sleep, so I'm blogging!) I hadn't intended on doing any sculpting, but somehow I found myself digging out the clay! "Maybe I'll condition some clay for another time" ...Well, before I knew it, I was forming a ball of clay into a head..."Well, maybe I'll make a tiny 3" baby"...."Okay so the head is 1½" tall, not so proportional for a 3" baby. I guess I'm making a 6" baby again!" "Well, then I'll practice rooting hair into the clay"...Nope this head is saying it needs to be bald!

This is what ended up coming together:

He ended up looking up with his back sort of arched


This is the same footed sleeper I made for my 1st sculpt


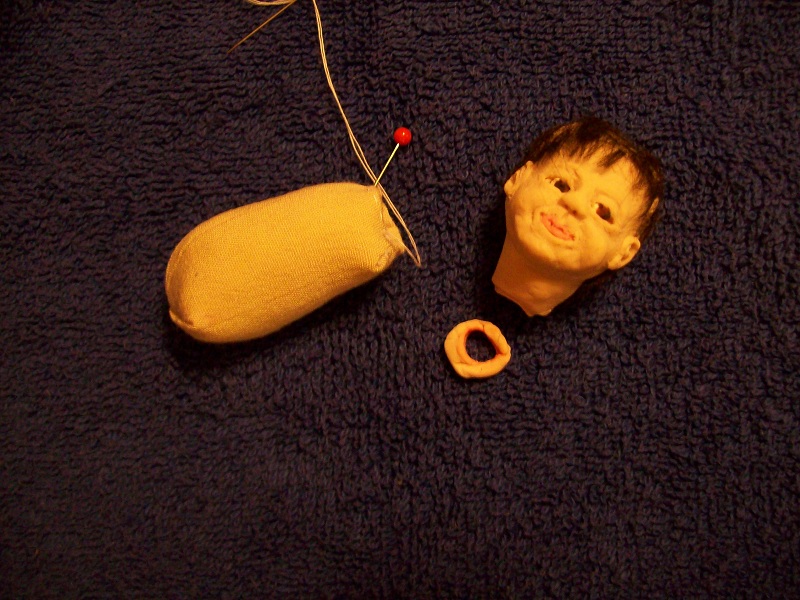
The eyes are the hardest, I think, and I put his nose up to high


Since I never posted about the 2nd baby I made, here are pictures of her:


All 3 of my clay babies

Thursday, January 19, 2012

I guess it is winter afterall!

So, we've had two snow days since my post on the 10th about having no snow!  The kids had off on the 13th and then again today.  It was very windy and cold today!  It is 10° with a wind chill of  -2°. BRRRR!

Wednesday, January 18, 2012

Simple Solutuions in Sewing

I had gotten a cute 101 Dalmatians outfit, but although it was labeled as a 5/6, it was rather short. 


I was going through a box of fabric someone had given me and found this:


I thought it would be perfect for a simple pair of pants to wear underneath!


Emily wearing the complete outfit:

Saturday, January 14, 2012

My First Clay Sculpted Baby

I had been wanting to try and see if I could sculpt a baby that actually resembled a human and not an alien.  I have a ways to go, but here is my first attempt:

Head before baking

I wrapped a moist towel around the hair while I baked it

Baked-Front

Left side

Right Side

Hair.  I attached the hair with strips of clay. 
I'll try a different way next time.

All the pieces

Arms

Feet

While I was trying to attach the head, the flange broke off :(

So I tried to poke a hole to sew it on with, and the neck started to crack!

So I added more clay and made a new flange.
I made it nice and sturdy, but it almost didn't fit in the top of the body!

All together

It's jointed

With the little jammies I made. 
I trimmed some fabric off the neckline as I thought it was going to be too long. 
I guess I was wrong!