Showing posts with label knitting. Show all posts

Thursday, November 11, 2021

Adventures in Knitting a Newsboy Hat

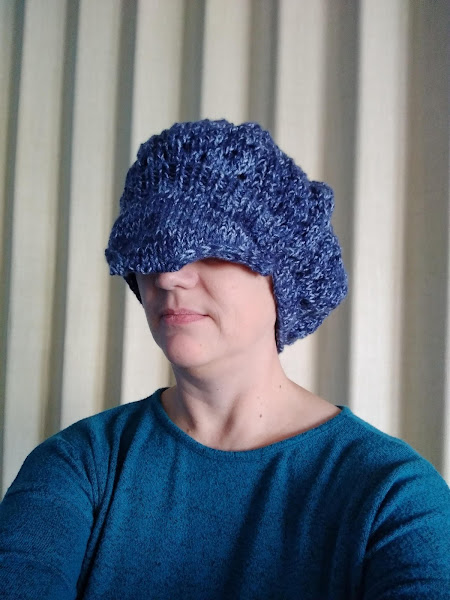
 In "Adoring April" by Chautona Havig, the character April has a particular hat and Camy Tang wrote a pattern for the hat. Chautona was looking for someone to knit the hat in denim yarn and I thought I'd give it a try. I got "I Love This Yarn Stonewash" from Hobby Lobby in denim. I dug out my trusty interchangeable knitting needles only to find that the tips that I needed were not in the box. I found a different set that I had gotten from someone and tried them, but the cable was too stiff. Undeterred, I ordered a replacement set of tips and a couple of cables. While I waited for them to arrive, I looked in my old knitting needles and found a set of 4 double pointed needles in the correct size. I was excited I could get started! I hadn't ever used double pointed needles before and my first attempt had one of the needles getting twisted and I had to start over.

I was on a roll (not counting the times that I messed up the lace pattern and had to rip out a row). Once I got far enough along to see the lace pattern taking shape, I realized that I had been reading the lace chart backwards (left to right instead of right to left) as the pattern didn't specify. So when I got to the "knit 2 together" parts, I had to switch them to "slip, slip, knit" instead or they would be angling the wrong direction. 

Originally, I had a marker at the beginning of the row and at the half way mark. Eventually, I put in markers at the beginning of each pattern repeat which made it much easier to count and make sure I had the correct number of stitches. (You can see the markers in the first picture). 

At the end of the lace chart, it gives the option to make the hat taller by utilizing a smaller pattern repeat. I planned on doing this as I assumed the original hat was done by using it. I discovered that it was impossible to use the smaller lace chart as it was a 6 stitch repeat and you have 128 stitches after finishing the first chart. 128 is not divisible by 6 so it wouldn't work out to use it. 


Knowing the smaller chart was out, I moved on to the hat band and the brim. I tried the hat on when I was finished and it was huge! I measured it and it was the size the pattern said it would be--24" circumference. I checked and the average adult male head is only 22.5", so this hat would be big on anyone. 


I added a zigzag of yarn like the pattern suggested and ran a row of elastic through it.


After doing that, I was able to get it to fit. 


I am wondering if it would work to take out one of the pattern repeats and just do 7 of them instead of 8. My mathematical reasoning about why it would fit better with 7 repeats is because the hat is 24" around with 8 sections. This means that each section contributes 3" to the final circumference. If you took one of them out, it seems that the final hat would be 21" instead, which would fit my head much better!


I was left with 1.25 oz/35 g of my 5 oz/142 g skein of yarn.


Friday, January 11, 2019

Worsted Weight Socks

I got a pair of tiny 9" knitting needles in size 8, so I went looking for patterns that I could use them with. I decided that a pair of socks was just the thing. I found one pattern which had me cast on 40 stitches and had a heel flap heel. I started at the top and knit the leg and it seemed like it might be too big. I tried it on and wasn't sure, so I worked the heel and part of the foot. I then tried it on again and it was definitely too big.
My original attempt

I also didn't like the look of the heel flap, so I did a search for a short row heel sock made with worsted weight yarn. I didn't find anything that I liked, so I decided to figure out my own pattern. In the process of looking for a sock pattern, I learned about Shadow/Twin Stitch Short Rows for heels from this video:

This is what I did for my socks:

1. Cast On 32.
2. K1 P1 for 8 rows (~1") 
3. Knit even for 20 rows (until top of sock measures ~5 1/2")
4. Knit 7, make Twin Stitch Knit (TSK). Switch to new needle and slide TSK       onto it. Turn
5. Purl 14, Twin Stitch Purl (TSP). turn
6. * K to 1 before TSK, make TSK, turn, Purl to 1 before TSP, make TSP, turn *
7. Repeat * to * until there are 5 Twin Stitches on each side and 6 regular stitches in the middle.
8. < K to TS, Knit TS as 1 stitch, make next TS into a Triplet (same as a Twin Stitch, only now there are 3 loops), Turn. Purl to TS, Purl TS as 1 stitch, make next TS into Triplet. Turn >
9. Repeat < > until there is 1 TS on each end. Switch back to 9" needle. Slide TS back onto it.
10. Knit 7 stitches, Place Marker. Continue knitting around back to marker, treating TS as 1 stitch.
11. Knit even for 20 rows (~6" from back of heel)
12. Remove marker. Knit 8. Switch to magic loop needle (I lost one of the 9" needles).
13. K1, SSK, K 10, K2tog, K1, Pull loop to move to back of sock. K1, SSK, K to 3 from end, K2tog, K1
14. (K1, SSK, K to 3 from end, K2tog, K1) Repeat on both sides of sock
15. Knit even
16. Repeat rows 14 and 15 until there are 4 stitches left on each side. Kitchener stitch to bind off.


One somehow ended up longer than the other!


These socks fit better than the ones I had started with, but were still a little big, so I started with 28 stitches and they fit just right, except I'm not 100% satisfied with the toe. I may alter the pattern to fix that, so stay tuned.

1. Cast On 28.
2. K1 P1 for 8 rows (~1") 
3. Knit even for 20 rows (until top of sock measures ~5 1/2")
4. Knit 6, make Twin Stitch Knit (TSK). Switch to new needle and slide TSK  onto it. Turn
5. Purl 12, Twin Stitch Purl (TSP). turn
6. * K to 1 before TSK, make TSK, turn, Purl to 1 before TSP, make TSP, turn *
7. Repeat * to * until there are 5 Twin Stitches on each side and 4 regular stitches in the middle.
8. < K to TS, Knit TS as 1 stitch, make next TS into a Triplet (same as a Twin Stitch, only now there are 3 loops), Turn. Purl to TS, Purl TS as 1 stitch, make next TS into Triplet. Turn >
9. Repeat < > until there is 1 TS on each end. Switch back to 9" needle. Slide TS back onto it.
10. Knit 6 stitches, Place Marker. Continue knitting around back to marker, treating TS as 1 stitch.
11. Knit even for 25 rows (~6" from back of heel)
12. Remove marker. Knit 7. Switch to magic loop needle.
13. K1, SSK, K 8, K2tog, K1, Pull loop to move to back of sock. K1, SSK, K to 3 from end, K2tog, K1
14. (K1, SSK, K to 3 from end, K2tog, K1) Repeat on both sides of sock
15. Knit even
16. Repeat rows 14 and 15 until there are 4 stitches left on each side. Kitchener stitch to bind off.


Saturday, November 10, 2018

Anniversary Present

During the last week of December last year, I got the idea to make my parents a graphgan for their 50th wedding anniversary. I was trying to finish up my temperature blanket but kept getting distracted by figuring out how to make a graphgan of my parents' wedding picture.


I checked out several programs/websites and finally settled on stitchboard.com. I still didn't really like the way the graph turned out as it had a big white blob on my dad's forehead and my mom's dress was half cream and half white, with no shading. I figured I could tweak it myself, but then I discovered that Stitchboard had other color palettes to pick from, so I tried them and found one I liked. The widest that the graph could be was 150 stitches which made it 255 rows tall. (For a total of 38, 250 stitches) I still needed to change some of the colors as it had pink, cranberry, and 2 shades of green. I wanted to use all the same brand of yarn but wasn't able to find the right colors I needed and ended up with a variety of brands.


Red Heart Super Saver Soft White
Bernat Natural
Red Heart Super Saver Aran
Caron One Pound Off White
Caron One Pound Soft Grey
Mainstays Medium Grey Heather
Red Heart Super Saver True Grey
Red Heart Super Saver Charcoal
Caron One Pound Dark Grey
Red Heart Super Saver Black

Originally, I was going to leave the yarns attached to the skeins, but soon realized that it was not a good idea!

So I wound off 10 yards of the colors and put them on clips or bobbins. It made it a lot easier to keep things organized. I did leave my lightest color still attached to the skein as I was going to use a lot of it.


I hadn't gotten very far before I wasn't happy with the darkest light color. It was thinner than the others and fuzzier. But I didn't have any other options so I continued. When I had 10 rows done, I knew I had to do something different for that color. 


So I looked some more and came up with a color that would fit in the color gradient scale closer to the lighter end. I knit up a 20 stitch swatch in the 10 rows to see if it would work.


I liked how it looked better, so I ripped out what I had made and rearranged the colors and adding the new color in as the 2nd lightest color.


I also decided to cast on with just 2 colors instead of the 10 colors the chart gave for the first row. It made it easier to do the first row with just the white and gray. 


I figured if I did 2 rows a day, not counting weekends, I'd get done with plenty of time to spare. 

This is how far I had gotten by May 2:


A week later, I put it aside. It was hard to work on with the kids being home and everything that was going on. This unfortunately caused me to have less time to get it finished in time. So now I need to do 3 rows a day.

Aug 30:


Sept 7:
Done with 2 sets of charts.


Sept 12:
34 bobbins so far


Sept 14 (1/2 done):


It is taking about 45 minutes per row now.

Sept 24:


Sept 26:


Sept 28:
This row took me an hour and 20 minutes to do the ONE row! There were so many color changes.


Oct 2:
56 bobbins.


Oct 3:


Oct 5:
2/3 done. 84 more rows, 36 more days until I need to be done. Working with 53 bobbins now.


Now I only have 1 set of charts left and with the amount of background, the rows should go faster.


The bobbins have gotten a bit tangled and messy.


Nice and neat and organized now.


Oct 10:


Oct 12:
Done with 3 sets of charts now.
Taking an average of 30 minutes a row.


Oct 15:
3/4 done.
It is measuring 40" wide x 36" tall so far.


Oct 24:
Only 25 bobbins now and about 20 minutes per row.


Oct 31:
16 more rows to go.


Nov 5:
I cast off today! It is 40" x 54"


Here are the bobbins I used during the construction of the blanket.


Backside:


Nov 6:
I laid the blanket on top of the backing fabric with the wrong sides together and pinned the blanket down to make it lay flat and even.


It was easiest to sit on the blanket while I worked.


All pinned down
Next, I folded over the edges of the backing fabric and pinned them down.


I had picked up these tags on clearance and we thought it was funny they were called "Crochet" labels when they all say "knit".


I sewed the backing down through all the layers.


All finished.


The tags I sewed on the back.  


I decided to give it to them after we set up for the party today.


Video of my parents opening the blanket:


I had decided to knit the blanket because with large crochet projects I've done, the sides sometimes end up wavy because the tension isn't always consistent. I would, however, crochet any other graphgans I might be crazy enough to undertake in the future. The color changes in knitting were much harder to keep neat and not too tight or too loose.