Showing posts with label tutorial. Show all posts

Friday, July 12, 2013

Barbie Cake Tutorial (Take Two)

I made a Barbie cake for my younger daughter 3 years ago and made a tutorial then, but I had several problems that I alleviated this time around, so I thought I'd do another one!

Pans greased and floured

I made 2 cake mixes


I didn't want the batter to overflow the top of the batter bowl, so I used 2 round pans, also


I think I could have gotten the amount of one of the round cake pans to fit in the batter bowl

cooling

I had a lot of orange frosting in cans, so I used that between the layers.

I angled the edge of the top round cake to match the diameter of the top part

Add top

wrap Barbie's legs in Saran Wrap

I used already colored frosting, but I didn't use the fish shaped sprinkles!

The cake looked really tall, but it was just right!

Push Barbie into cake (this smooshes the cake some)

Barbie got an "updo" while I decorated the cake

All finished


The "reveal"


At the party


My 1st Barbie cake.
Interstingly, my younger daughter loves pink, but I could only find a blue dressed doll and my older daughter loves blue, but I could only find a pink dressed doll!

Saturday, April 6, 2013

Needle Keeper (Tutorial)

I was at Walmart the other day and I saw a "Needle Nest".


Since my "travel" sewing needle usually goes in with my straight pins, I thought it looked like a neat idea but simple enough to make myself.


I dug around and found a cute little container and one of the magnetic sports calendars I'd gotten from the kids' doctor office.


Since my magnet had writing on the back, I cut a piece of colored paper to cover it.


All done!  I may put something on the pink paper at some point, but it's nice this way, too.


And it's functional for keeping the needles in place ☺


I didn't glue or tape the magnet in place, it's just a tight enough fit that it stays in place.

Tuesday, January 31, 2012

Tutorial: How to make a sock monkey out of 2 pairs of anklet socks

I found some socks that I thought would make cute sock monkeys.  Unfortunately, they were very short and didn't have any part that would come up the leg (if you were wearing them) so there wasn't anything to use for the legs.  I decided to buy 2 matching pairs of the socks and see if I could get it to work!

Here is how I did it:
Take 2 pairs of anklet socks

Cut off the top just under the heel on 1 sock

Cut off just the ribbing on 1 sock

On the sock that you cut off under the heel, cut from the toe to the opening
NOTE:  I would suggest starting at the toe and cutting to within 1" of the top where you cut off the heel (leaving an uncut band at the top)

Pin the 2 socks' cut edges together lining up the top and bottom of the socks

Sew ¼" from edge all the way around

This is what you end up with

Turn it inside out with the heel on top

Sew.  Clicking the picture will enlarge it making it easier to see the marks.
I ended up with more left over pieces having to use 2 pairs.

Turn right side out

This is why I would leave the 1" band uncut at the top

Stuff

I also had to sew this extra area shut, too

Sew him together

Here is the seam along the belly where the 2 socks were attached together

Monday, January 30, 2012

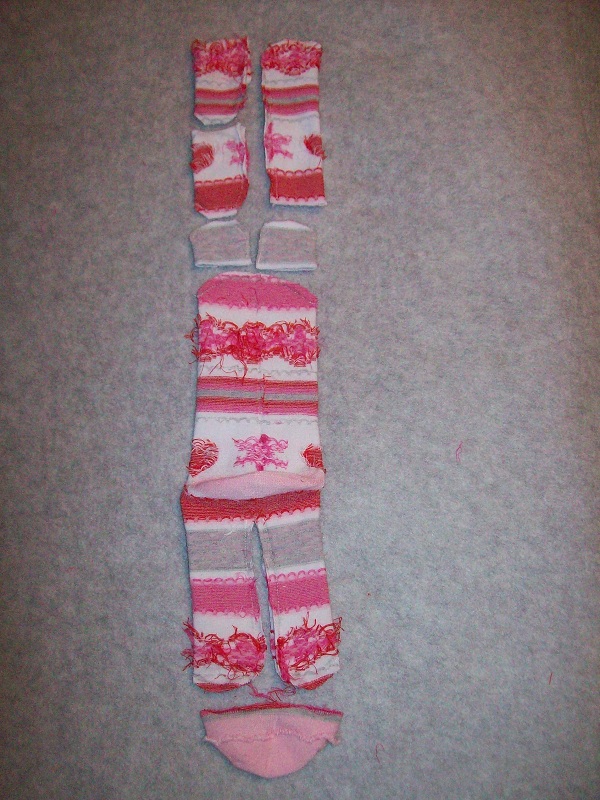
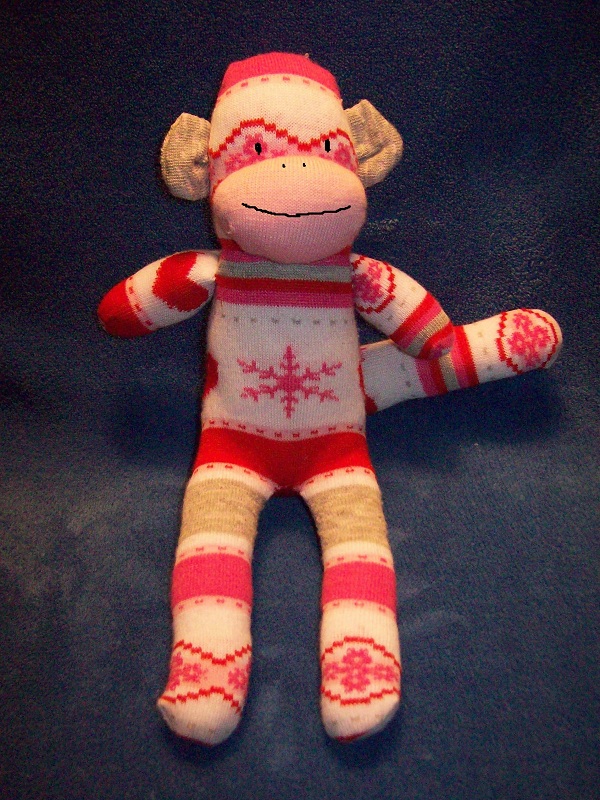
Tutorial: How to make a sock monkey out of one knee high sock

I found a pair of knee high socks that I wanted to use for a sock monkey.  I figured that there had to be a way to get a sock monkey out of only 1 sock since to use both socks on 1 monkey would mean LOTS of left over scraps. 

Here is how I did it:

Take 1 sock ☺

Turn it inside out so the heel is on top

Sew the pieces. 
If you click on the picture it should be easier to see the marks

Cut the pieces apart

This is all that I had as extras!

Turn right side out


Stuff

Sew him together - Ta da!

Sunday, July 31, 2011

I Was Inspired

I got this shirt for 18¢ and decided I wanted to wear it to church,
but what to wear with it?
At this point it was 5:00 and we needed to eat dinner, get baths taken,
 and night time devotions done!

I dug through my stash and found this fabric
I decided to do a wrap skirt since it didn't require seeing if I had a zipper and I didn't feel like having an elastic waist.  I used the math from this site.  I rounded my top measurement up (It was X.3" and I figured it would just make it roomier.)  It turned out my fabric wasn't big enough for the pieces (unless I wanted my skirt 15" long!), so I had to piece the 2 front pieces.  Then I cut two pieces identically instead of mirrored and I didn't have enough fabric to cut another, so that went in the underneath part!  Then when I was sewing, I sewed a seam wrong sides together, so I had to pick it out, and then I sewed the left side to the right side piece so I had to pick out a seam again!  Next I had to figure out how to get my ties out of the pieces of fabric left over....

I had enough that was on the selvedge that I just tucked
the raw edge under and sewed the selvedge edge over the top

I made one tie string WAY to long!
 I figured it for wraping all the way around my waist instead of just my back

The waist was puckering (so much for it just being roomier!), so I added darts.
This also shows the buttonhole for the tie string to go through

2 hours later, I was All Finished ☺  (this picture was taken in the morning, though,
 since I wasn't going to wake up one of the kids at 11:00 to take it!)
(of course, had it not been so late and I didn't make so many mistakes, it would have gone much quicker!)